.png)
Key Takeaways
- Integrating HubSpot forms with Google Tag Manager enables accurate tracking of form submissions on Google Analytics.
- Following best practices for naming tags, variables, and triggers keeps GTM organized and easy to maintain.
- Embedding HubSpot forms correctly on your website ensures proper functionality and styling across platforms.
- Creating custom HTML tags, triggers, and data layer variables allows seamless communication between HubSpot forms, GTM, and GA4.
- Testing and verifying submissions in Google Analytics ensures tracking is accurate and data-driven insights can be captured effectively.
You embedded HubSpot forms on your website. Visitors fill them out. But when you open Google Analytics 4... the data is either missing or incomplete.
That disconnect between form submissions and analytics reporting is one of the most common tracking gaps we see across B2B SaaS companies. And it's more costly than most teams realize.
The fix is straightforward: use Google Tag Manager to listen for HubSpot form submission events, push them into the data layer, and send them to GA4 as custom events. This guide walks you through every step, from creating a HubSpot form to verifying the submission appears in GA4 Realtime reports.
Before you start, make sure you have active accounts for HubSpot, Google Tag Manager, and Google Analytics 4. Let's get into it.
Agency Insight
Across roughly 250 B2B SaaS accounts running HubSpot-to-GA4 form tracking, only 35--45% of total "contact" submissions correlate with qualified pipeline. When form events are passed back into ad platforms with offline CRM conversion signals (SQL or opportunity stages), smart bidding shifts impression share toward fewer but higher-intent queries -- typically improving opportunity-to-demo rates by 18--25% without increasing media spend.
Why Does HubSpot Form Tracking in GA4 Matter for B2B SaaS?
HubSpot forms are the primary lead capture mechanism for most B2B SaaS websites. But HubSpot's native analytics and GA4 measure different things. Without proper tracking, you can't connect form submissions to the traffic sources, landing pages, and user journeys that GA4 reports on.
When you track HubSpot form submissions as GA4 events, you gain the ability to:
- Attribute form fills to specific channels -- organic, paid, referral, or direct
- Mark form submissions as key events (formerly conversions) in GA4 for reporting and optimization
- Build retargeting audiences in Google Ads based on users who submitted or abandoned forms
- Compare form performance across different pages, campaigns, and user segments
Without this setup, your GA4 data has a blind spot at the exact moment a visitor becomes a lead. That's a problem.
How Do You Create and Publish a Contact Form in HubSpot?
If you already have a HubSpot account with forms embedded in your website, Skip to the next step
Start by logging into your HubSpot account.
Once you're in, go to the "Marketing" section and select "Forms."

On the next page, click on "Create a free form.

Select the type of form you want. For this guide, we're going with the "embed form", because we want to embed a form on our website. Click next.

You can choose a blank template to build from scratch, add your own fields, or select from pre-made templates. In this case, we're using the pre-made "contact form" template.

After selecting the Contact Us template, click "Start."
By default, the premade form has property hints and it clutters the form and it is not necessary to have them always.
To make the form clean, click on "Actions" in the top right corner and turn off "property hints."

The property links will disappear and the form will look like this

You are not limited to the fields you get from the premade template.
You can choose various fields from the left side panel such as phone number, city, a captcha, social media fields, payment, and many more.
While most of the fields are free, some of them are paid features like payment options.
Also don’t forget to check out the options, style & preview, and Automation sections right next to the forms and customize as per your needs
Expand each section and add the features you want, then hit "Update."

Once you hit update, review any warnings and Click "Publish."

After publishing, your form will be available in your Hubspot dashboard and a popup will appear.

In the popup, click on the embed code and click "Copy" and save this code in a secure location.

Embed the form into the website:
By following the above steps, you created a form on Hubspot.
But you need to embed the form on your website. For that, you need to paste the above code into your website.
In the above code, there are two script tags, take the first script and paste it inside the head tag of your website’s HTML.
Paste the second script tag code between the body tag. Use the “Code” tag to embed the script in the body tag.
Also, make sure you paste the below code where you want the form to be on the website.
But if you are using cms such as WordPress or Wix, the process to paste the above code may vary.
So, if you're unsure, contact the person who set up your website or your CMS (Content Management System) expert.
Once you've embedded the code, you'll see the form live on your website.
Make sure to style the form as per your requirements.
Setup Google Tag Manager The Right Way
If you have the GTM account set up, Skip to the 3rd Step
1. Getting Started:
- Login to Google Tag Manager.
- Click on "Create Account" in the top right corner.

2. Account Setup:
- On the new page, enter your company name in the "Account Name" field.
- Choose your country from the dropdown list.
- Give your setup a recognizable name in the "Container Name" field.
- Choose "Web" and click "Create."

3. Accept Terms:
- After clicking Create, you'll be asked to accept the terms. Tick the checkbox and click the "Yes" button in the top right corner.

4. Code Snippets:
- On the next page, you'll get code snippets for your website.
- Copy the first code snippet and paste it into the head tag of your website's HTML source code.
- Copy the second code snippet and paste it right at the beginning of the body tag.

The HTML code looks something similar after embedding Hubspot Google Tag Manager codes above
5. Preview:
- Click "OK" and then "Preview."

- Enter your website's URL and click "Connect."
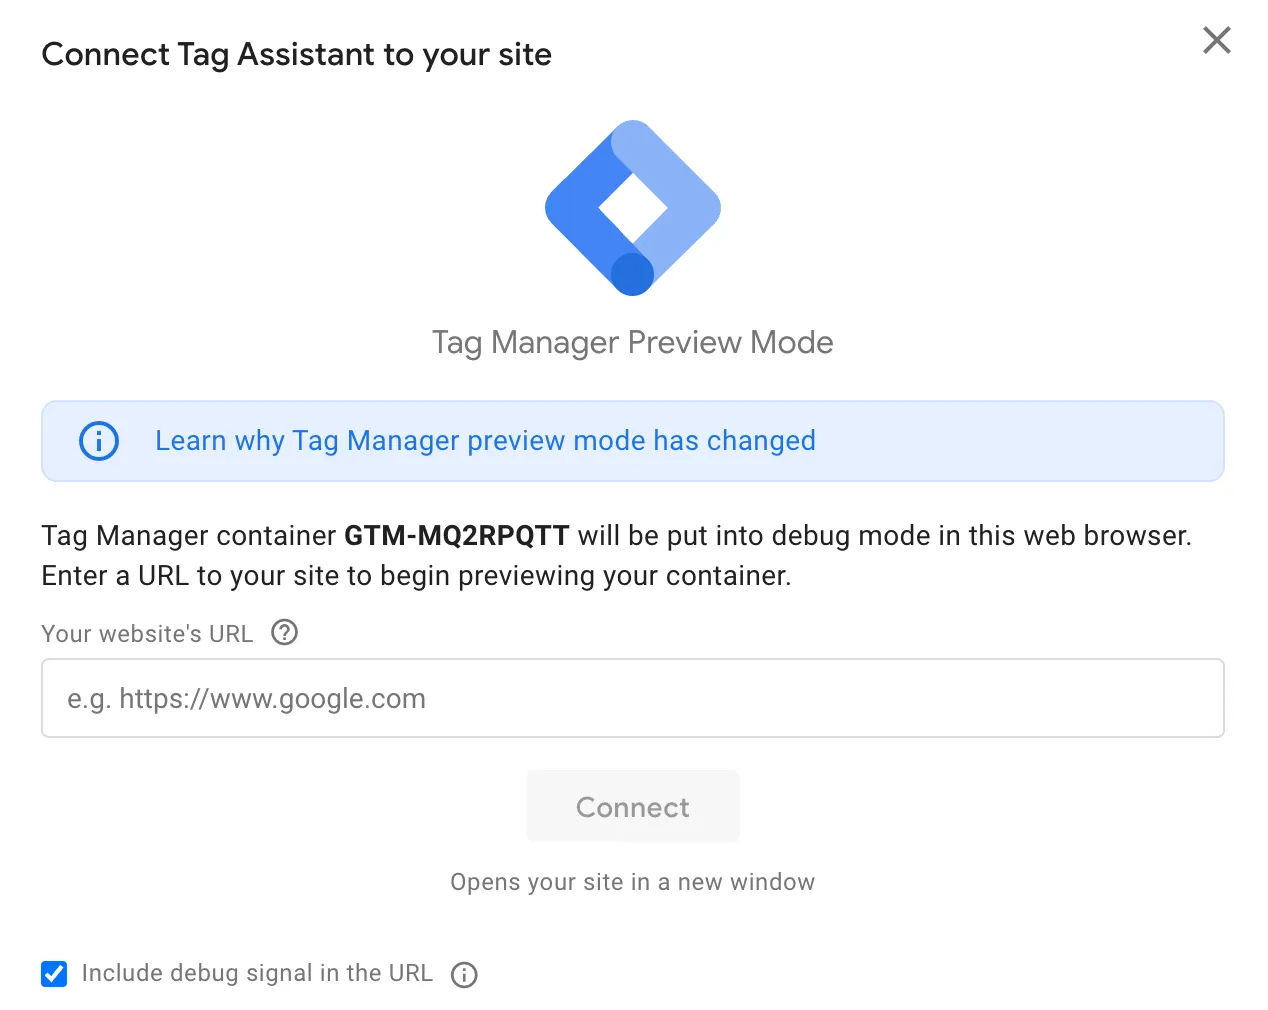
6. Tag Assistant Connection:
- If everything goes smoothly, you'll see the connected message.

- A new window will appear, saying "Tag Assistant is connected successfully."

7. Final Steps:
- Go back to Google Tag Manager.
- Once you are okay with the preview, hit "Submit." and provide the necessary information such as version name and description.
By following these steps, you've successfully set up the Google Tag Manager(GTM)
Create a New Tag - Custom HTML Tag
Once you are done with the above setup, you can create Tags, variables, and triggers.
For now, we are creating a custom HTML tag. The purpose of this tag is to connect the HubSpot forms with Google Tag Manager.
The custom HTML tag allows you to inject specific code snippets or scripts into your website pages, and in this case, it can be used to integrate your HubSpot forms with GTM.
So, let’s see how to create a custom HTML tag in Google Tag Manager.
1. Creating a New Tag:
- In Google Tag Manager, head to the "Tags" section and click on "New."
2. Tag Configuration:
- Choose "Custom HTML" as the tag type.

- Paste the provided code in the custom HTML field.
<script type="text/javascript">
window.addEventListener("message", function(event) {
if(event.data.type === 'hsFormCallback' && event.data.eventName === 'onFormSubmitted') {
window.dataLayer.push({
'event': 'Hubspot-form-success',
'hs-form-guid': event.data.id
});
}
});
</script>
- This code listens for messages from HubSpot when a form is successfully submitted.
- If the correct message is received, it pushes data to the GTM data layer.
- Specifically, it sends an event named 'hubspot-form-success' along with the unique form identifier ('hs-form-guid').

3. Setting Triggers:
- Click on "Triggering."
- In the trigger section, select "All Pages."

4. Naming and Saving:
- Give your tag a name, like "Forms — HS Success Listener."
- Click "Save."
Remember, this setup ensures that every page on your website triggers this tag.
Create a new trigger
1. Accessing Triggers:
- Go to Google Tag Manager, and navigate to the "Triggers" section.
- Click on "New" to create a new trigger.
2. Trigger Configuration:
- Choose "Custom Event" in the trigger configuration.
- In the field provided, type 'hubspot-form-success' as the custom event name.
3. Trigger Fires On:
- Ensure that under the "This trigger fires on" section, you have selected "All Custom Events."
4. Naming and Saving:
- Give your trigger a name, such as "HubSpot Form Submit."
- Click "Save."
This trigger is set up to activate whenever the custom event 'hubspot-form-success' occurs.

Add a data layer to read Hubpost’s form guid
1. Navigate to Variables:
- Go to the "Variables" section in Google Tag Manager.
2. Select User-Defined Variable:
- Look for the "User-Defined Variables" section.
3. Choose Data Layer Variable:
- In the variable configuration, select "Data Layer Variable."
4. Name the Variable:
- Give the variable a name - "forms-hs-form-guid."
By following these steps, you're essentially creating a user-defined variable that pulls information from the data layer and specifically names it "forms-hs-form-guid."
This variable can then be used in tags or triggers within Google Tag Manager for tracking or other purposes.
Setting up a Google Analytics Account
Skip to the 4th step if you already created a Google Analytics Account.
Before making a GA4 tag, let's start by setting up your Google Analytics account. We need the Measurement ID from Google Analytics to put into the GA4 tag creation process.
Here’s how to do it.
1. Google Analytics Account Setup:
- Log in to your Google Analytics account and go to the "Admin" section.
- Click on "Create" and choose "Account."
- Enter a name and click "Next."

2. Property Configuration:
- Provide a property name, select your time zone and currency, and click "Next."

- Describe your business, select industry and size, and click "Next."

3. Objective Selection:
- Choose your business objectives and click "Create."
- Accept the terms and conditions by clicking "I Accept."

This will create your account and property.

4. Create Data Stream:
- In the next screen, select "Web".

- Enter your website URL without "https."
- Name your website and click "Create Stream."

This will create a data stream for your website which can be used for capturing data.
5. Tag Manager Installation:
- Choose to install the tag manager manually.
- Copy the provided code and paste it at the beginning of the `<head>` tag in your website's HTML.

- Copy the measurement ID from the stream details.

Create a Google Tag
In Google Tag Manager, go to "Tags," click "New," and select "Google Tag" from the list.
- Paste the measurement ID in the tag configuration.
- In the triggering section, select "All Pages."
- Click save

Create a GA4 tag
- In Google Tag Manager, go to "Tags" and click "New."
- Choose "Google Analytics > GA4 tag."

- Enter the measurement ID and give a name to the Event name field.
- You will see the Google Tag found in the container message.
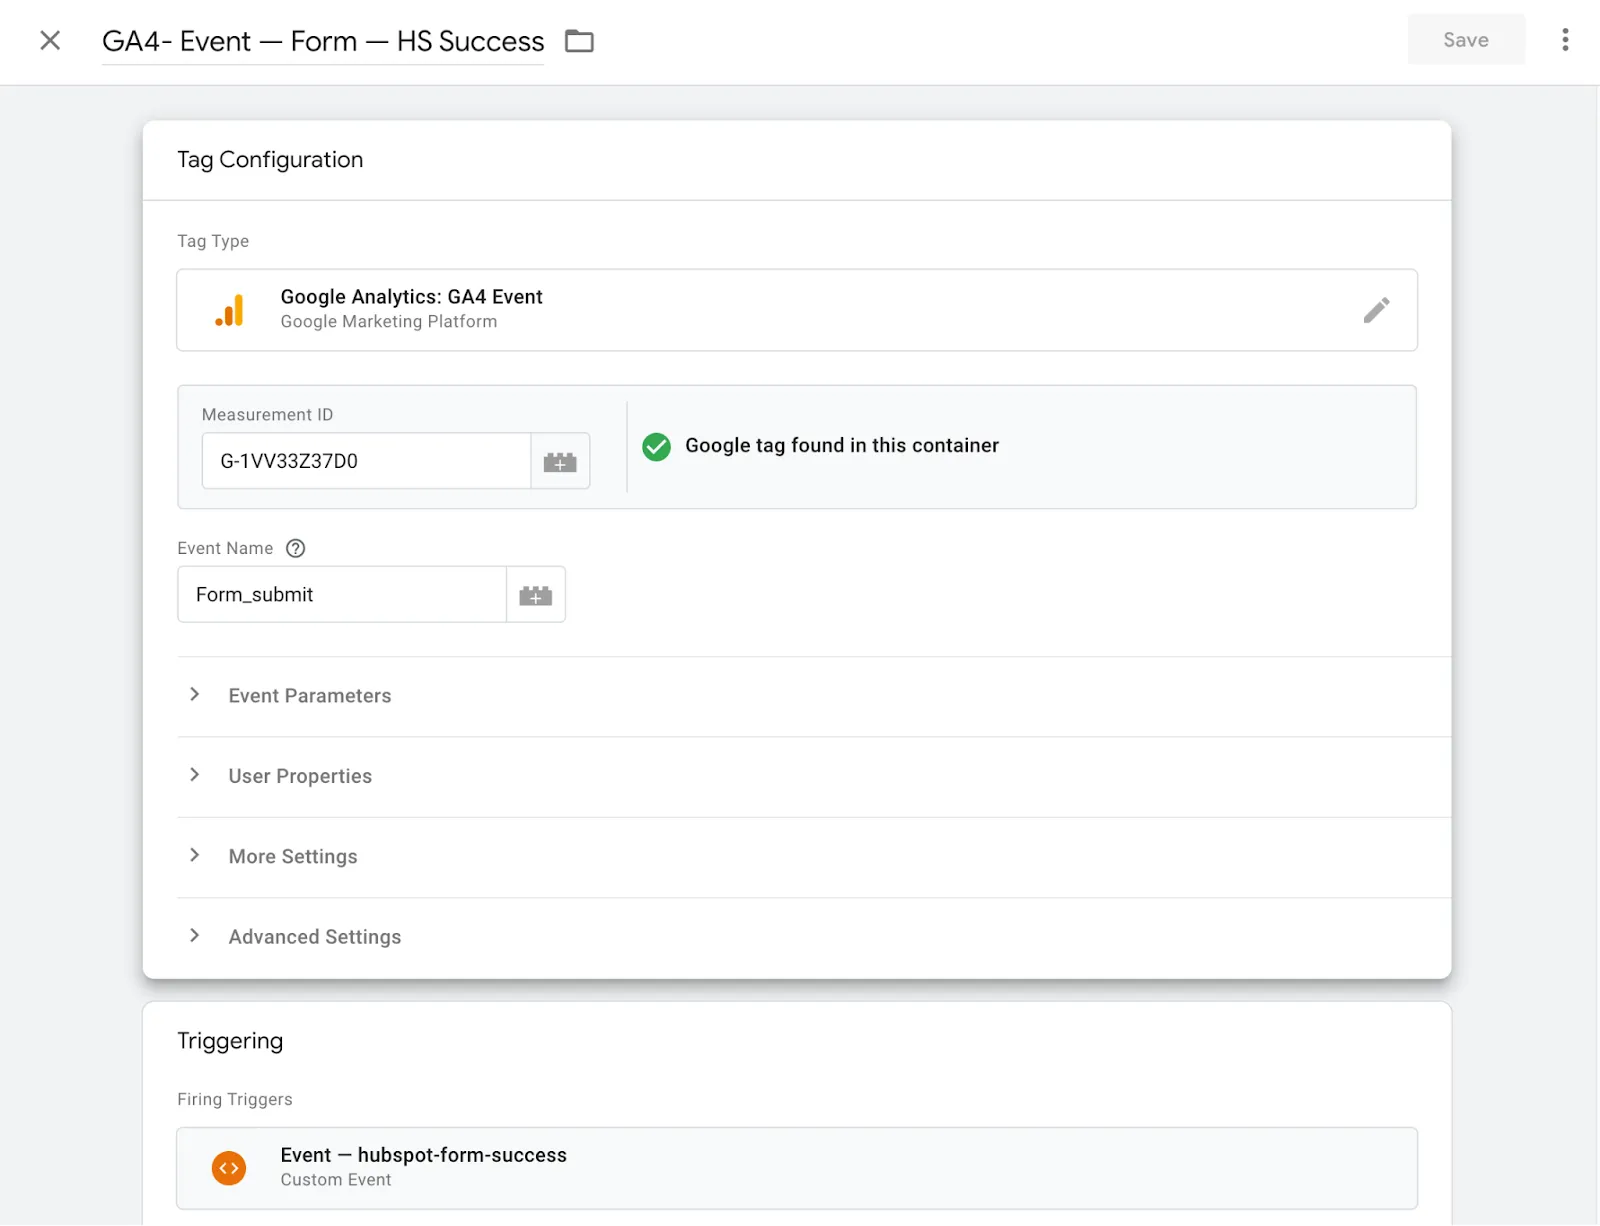
- In the triggering section, choose "HS Form Submission."
- Name the tag as "hs_form_submission" and save.
Test The Hubspot Form in Google Analytics 4
Go to your form on the website and fill that.
Go to analytics and click reporting > Realtime and you can see the results below.

What Are the Best Practices for Naming Tags, Variables, and Triggers?
A messy GTM workspace becomes unmanageable fast. Follow these conventions:
- Tags: [Platform] -- [Action] (e.g., "GA4 -- HS Form Submission")
- Triggers: [Source] [Event Type] (e.g., "HubSpot Form Submit")
- Variables: [category]-[specific-name] (e.g., "forms-hs-form-guid")
Always preview before publishing. Use GTM's version history to roll back if something breaks. And document your tracking setup in a shared spreadsheet so your team knows what each tag does. Future you will be grateful.
For a deeper dive into GA4 audit best practices, we have a separate checklist that covers event validation, data retention settings, and cross-domain tracking.
Get Your HubSpot Form Tracking Right -- or Let TripleDart Handle It
Setting up HubSpot form tracking in GA4 using Google Tag Manager is a manageable process when you follow each step: create the form, install GTM, build the listener tag, configure the trigger and variable, set up GA4, create the event tag, and test thoroughly.
The payoff is worth the effort. With accurate form tracking, you can attribute leads to channels, optimize ad spend toward high-intent forms, and build retargeting audiences that convert.
If you want deeper insights from your data -- or if you'd rather have experts handle the technical setup -- TripleDart is the AI-native SaaS marketing agency that builds and runs inbound GTM engines for B2B Tech and SaaS companies. We act as your extended GTM team, with full accountability for pipeline and revenue results. We've configured HubSpot form tracking across hundreds of accounts and know exactly where the common pitfalls are.
Frequently Asked Questions
Can I track HubSpot forms on WordPress with this method?
Yes. The GTM-based approach works on any platform where you can install the GTM container snippet, including WordPress, Webflow, and custom-coded sites. The HubSpot form embed code and GTM listener function identically regardless of the CMS.
What is the difference between tracking HubSpot embedded forms and popup forms?
Embedded forms fire the hsFormCallback postMessage event that our listener code captures. Popup forms and standalone HubSpot pages may use a different event structure. For popups, you may need to adjust the listener or use HubSpot's native GA4 integration as a fallback.
How do I send HubSpot form submission events to Google Ads for conversion tracking?
Once the event is marked as a key event in GA4, link your GA4 property to Google Ads under Admin > Google Ads Links. Then import the conversion in Google Ads under Goals > Conversions > Import. This feeds the form submission data into Google Ads bid optimization.
Is server-side tracking better for HubSpot forms in GA4?
Server-side tagging through GTM's server container can improve data accuracy by bypassing ad blockers and reducing client-side JavaScript load. However, it adds complexity and cost. For most B2B SaaS companies, client-side GTM tracking with the listener approach described here provides sufficient accuracy. Consider server-side if you're losing more than 15--20% of events to ad blockers.
How does TripleDart help with HubSpot form tracking and GA4 setup?
As an AI-native SaaS marketing agency, TripleDart builds and operates full-funnel inbound GTM engines for B2B Tech and SaaS companies. Our marketing analytics team sets up and audits HubSpot-to-GA4 tracking as part of that infrastructure, configuring GTM containers, building custom data layer implementations, mapping form events to GA4 custom dimensions, and connecting conversion data back to ad platforms for bid optimization. We combine senior marketing expertise with AI-powered workflows that enhance speed, quality, and performance across the entire GTM engine. If your tracking is broken or incomplete, book a call and we'll diagnose the gaps.
.png)


.webp)


.webp)


.webp)


.webp)
.png)


%20(1).png)


.webp)
.webp)
.webp)


%20Ads%20for%20SaaS%202026_%20Types%2C%20Strategies%20%26%20Best%20Practices%20(1).webp)


.webp)


.webp)


![Creating an Enterprise SaaS Marketing Strategy [Based on Industry Insights and Trends in 2026]](https://cdn.prod.website-files.com/632b673b055f4310bdb8637d/6a218bacea463474377dfd32_34%20-%20Creating%20an%20Enterprise%20SaaS%20Marketing%20Strategy.png)


.webp)


%20Agencies%20for%20B2B%20SaaS%20Compared%20(2026).webp)

.webp)

%20with%20Hubspot.webp)


_%20Expert%20Reviews%20%26%20Comparisons.png)


.webp)


_%20Comparison%2C%20Strengths%2C%20and%20How%20to%20Choose.png)


.webp)


.webp)


.webp)


%20Tools%20in%202026_%20Vetted%20List.webp)


![How to Measure AEO Success: 12 Metrics Beyond Clicks [2026 Framework]](https://cdn.prod.website-files.com/632b673b055f4310bdb8637d/6a0d664b326187e99b3d5960_6%20-%20The%20Ultimate%20Guide%20to%20Measuring%20AEO%20Success%20in%202026.png)
![7-Step Workflow for AEO-Ready Content [2026 Framework]](https://cdn.prod.website-files.com/632b673b055f4310bdb8637d/6a0d55ea88913ede1d3a7123_5%20-%20Workflows%20for%20Optimized%20AEO-Ready%20Content%20Creation.png)
.png)

![How to Structure Content for AEO and GEO [With Templates]](https://cdn.prod.website-files.com/632b673b055f4310bdb8637d/6a0c6a56eb700472e635ff33_1%20-%20How%20to%20Structure%20%20Content%20for%20AEO%20and%20GEO%20%20Summaries%20(2026).png)


.png)
.png)


.webp)


%20Agencies%20in%202027.webp)
.webp)
![Top 9 AI SEO Content Generators for 2026 [Ranked & Reviewed]](https://cdn.prod.website-files.com/632b673b055f4310bdb8637d/6a2a3e3105bc1a127aae4e8e_34%20-%20Top%209%20AI%20SEO%20Content%20Generators%20for%202026%20%5BRanked%20%26%20Reviewed%5D.webp)