How To Track Form Submit In GA4 Using GTM

Key Takeaways
- Tracking forms is essential to measure website engagement and conversions.
- Different forms (redirects, page refreshes, inline messages) need different tracking methods.
- GTM + GA4 offers 5 main tracking approaches: Form Trigger, Thank You Page, Element Visibility, DOM Scraping, and dataLayer Events.
- Always test in GTM’s Preview & Debug mode to ensure accurate tracking.
- Proper form tracking provides actionable insights to optimize marketing and improve ROI.
Form tracking is like a digital pulse-check for your website. It helps you understand how effectively your site engages visitors.
But tracking forms is tricky! Why? Because different forms behave differently. Some refresh the page, others redirect to a “Thank You” page, and another might take you to a common page.
And when forms use different, non-standard methods to submit data, Google Tag Manager (GTM) might not recognize and track these submissions.
However, a few workarounds can resolve this issue. We’ll explore 5 such alternatives in this blog post. Let’s dive in!
5 Methods to Track Form Submission in GA4 with GTM
Before we begin, ensure you can access your website's Google Tag Manager account (GTM). Plus, have a GA4 property created for your website in Google Analytics.
With that settled, let’s get started!
Method 1: Google Tag Manager Form Submission Trigger
This method works well for forms where Google Tag Manager can automatically detect submissions without custom configurations.
Its benefits? This GTM Form Submission Trigger is easy to set up and captures the essential form interactions, providing insightful data minus the coding hassle.
Setup Guide
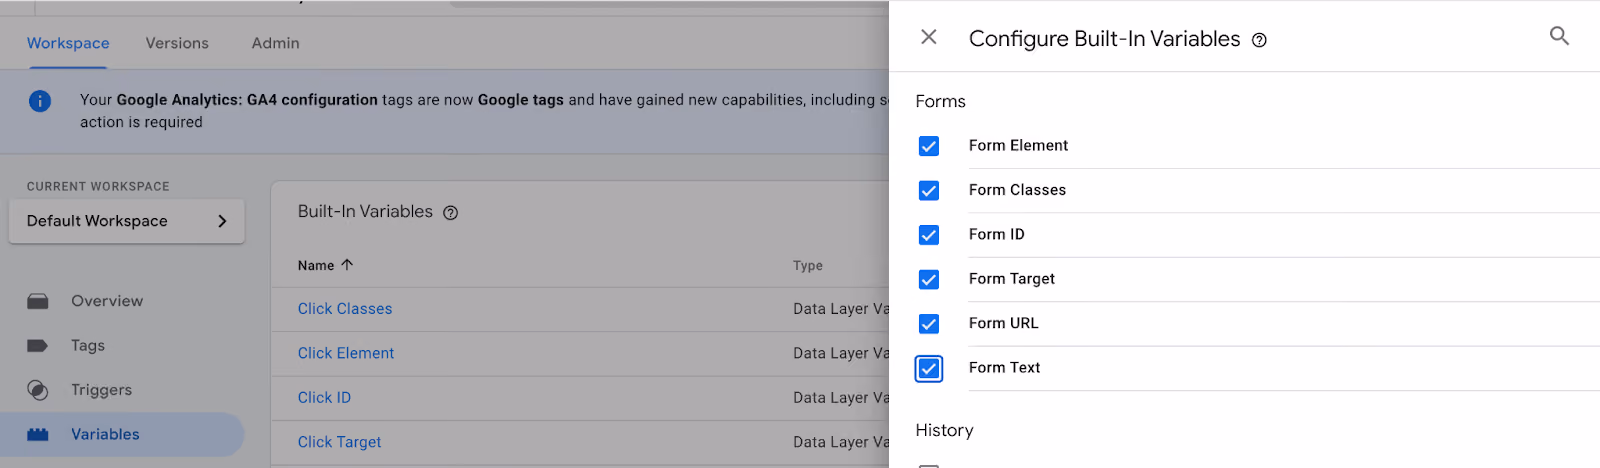
Step 1: Activating Form Variables in GTM
- In GTM, go to the “Variables” section.
- Look for “Configure” under the “Built-In Variables”.
- Scroll to find form-related variables, such as Form ID, Form Classes, and Form Text, and check them to enable.
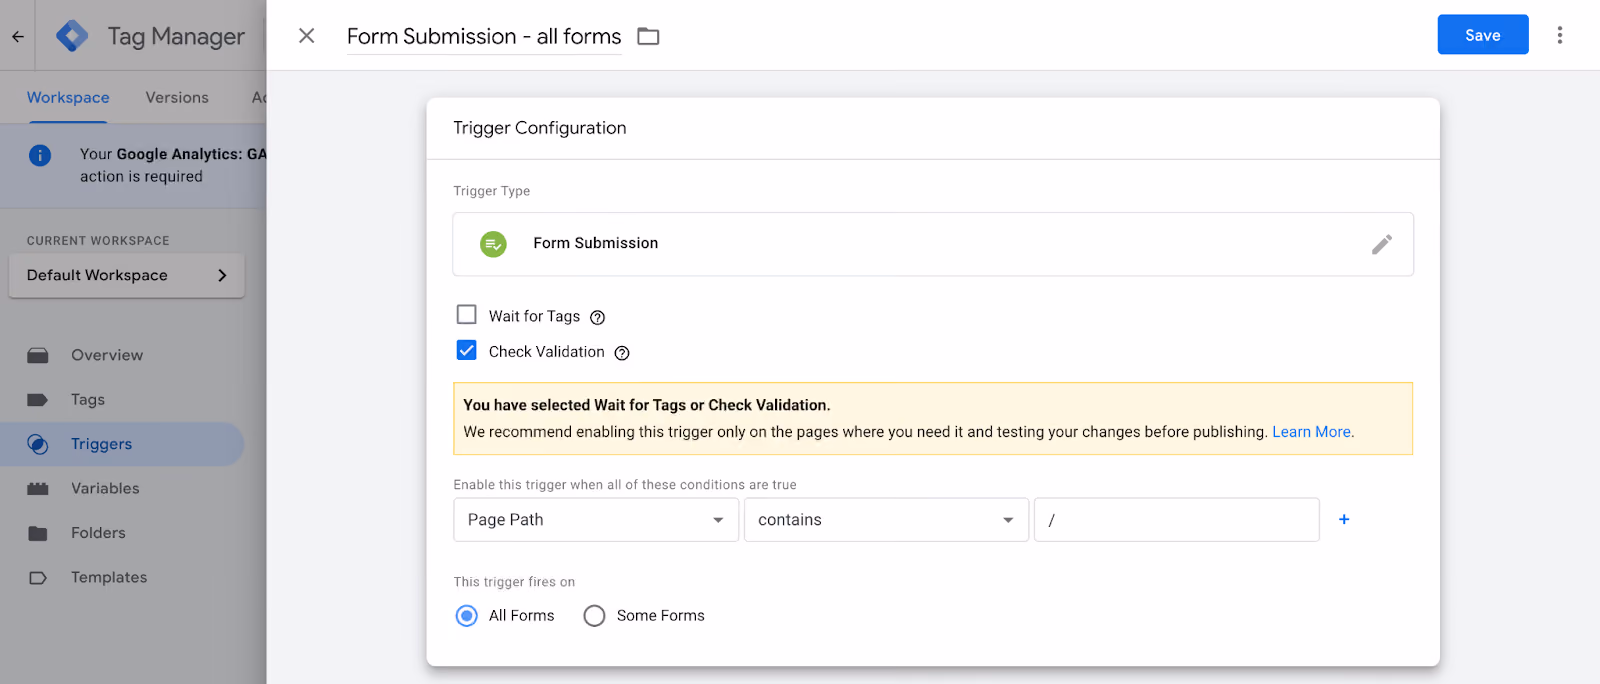
Step 2: Setting up the Form Submission Trigger
- Navigate to the “Triggers” section in GTM.
- Click “New” to create a new trigger and name it something descriptive like "Form Submission Trigger."
- For Trigger Type, select “Form Submission”.
- Next, turn on “Check Validation”. This ensures that GTM does not log submissions when the form encounters an error or fails to complete its standard action.
- In the field “Enable this trigger when”, set the conditions when you want the trigger to fire. For example, if you want it to be active on all pages, set “Page Path—Contains—/”.
- Now, under “This trigger fires on”, you’ll have two main choices:
(i) All Forms: To track every form submission on your site.
(ii) Some Forms: To specify which forms to track, based on conditions like Form ID, Form Classes, or even Page URL.
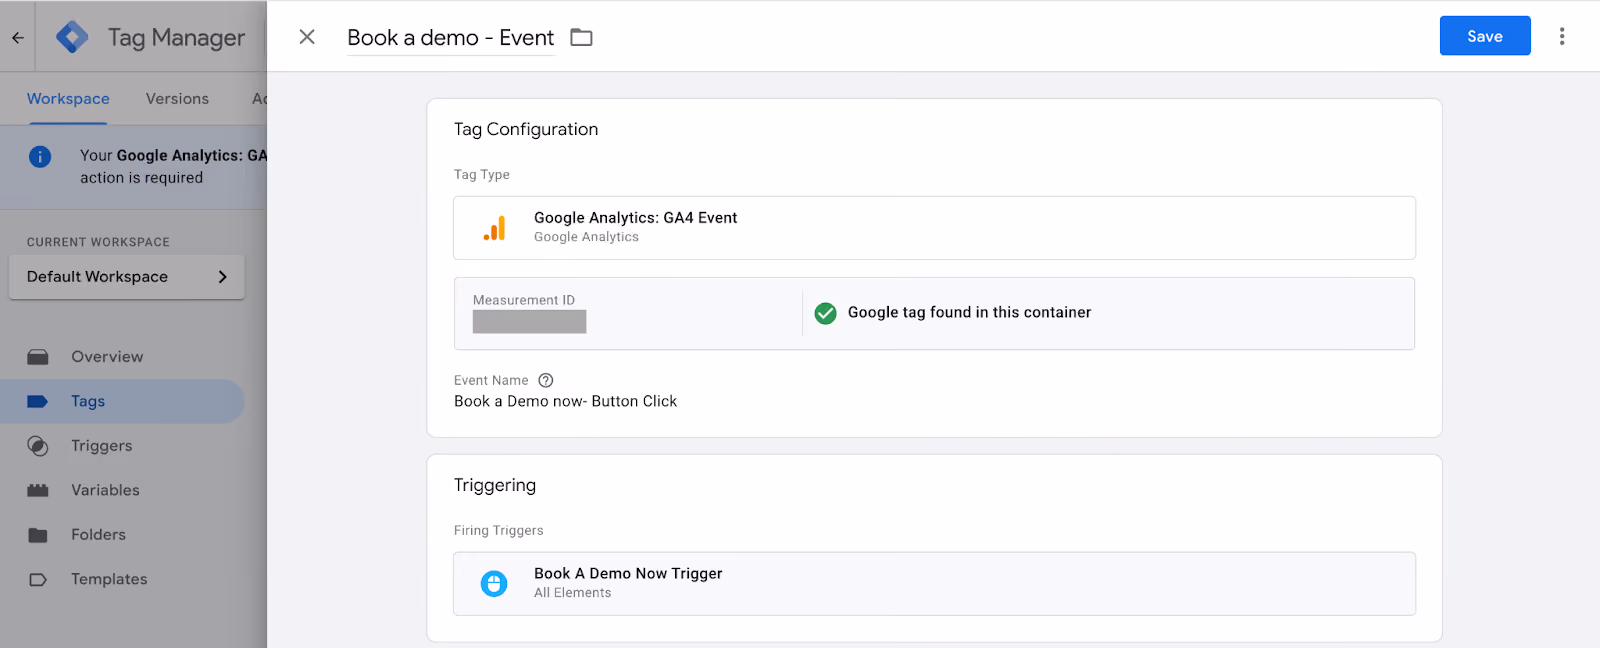
Step 3: Linking the Trigger to a GA4 Event Tag
- Head to the “Tags” section and hit “New” to create a new tag.
- Select “Google Analytics: GA4 Event” as your tag type.
- In “Configuration”, choose your GA4 Configuration Tag or enter your GA4 Measurement ID.
- Set “Event Name” to a descriptive term like “form_submission”.
- Under “Triggering”, select the Form Submission Trigger you just created.
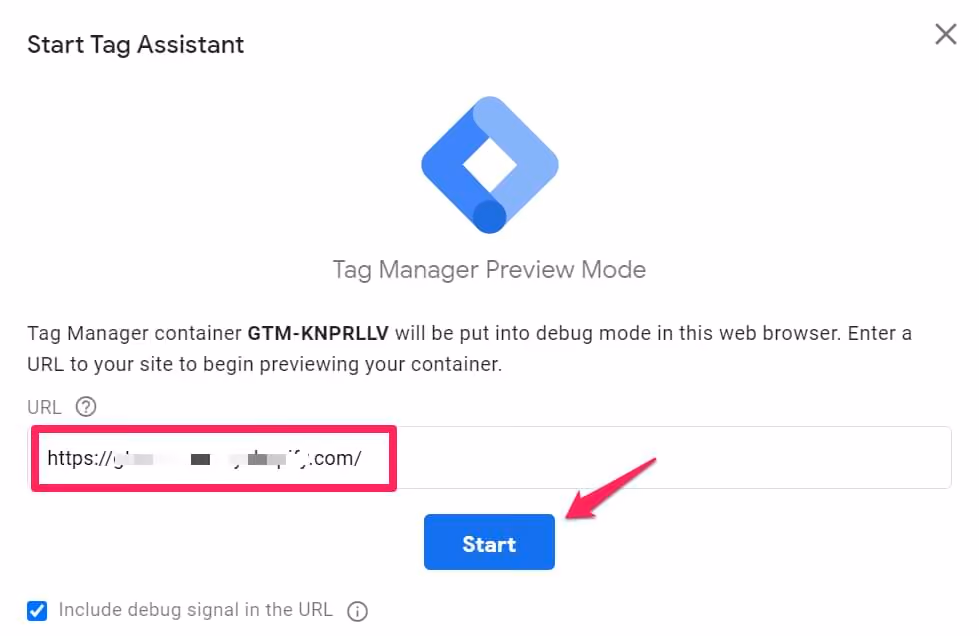
Testing
- Click “Preview” in GTM to enter the debug mode
- Enter your website’s URL to start the session. This opens your site in a new tab, with a debug pane at the bottom.
- Fill out and submit a form on your website
- In the debug pane, look for the Form Submission Trigger you set up. It should activate upon form submission.
- Ensure the GA4 Event Tag fires, indicating the data is being sent to GA4.
Method 2: Tracking Form with a Thank You Page
This method is a match made in heaven for forms that redirect users to a "Thank You" page. But this also works for a confirmation message or a voucher code—if your form ends with a redirect.
Utilizing a "Thank You" page for form tracking simplifies conversion analysis, enhances user behavior insights, and increases data accuracy while streamlining goal tracking in GA4.
Setup Guide
Step 1: Identify the "Thank You" Page URL
- Note down the exact URL of your "Thank You" page. This is the target destination you'll be tracking.
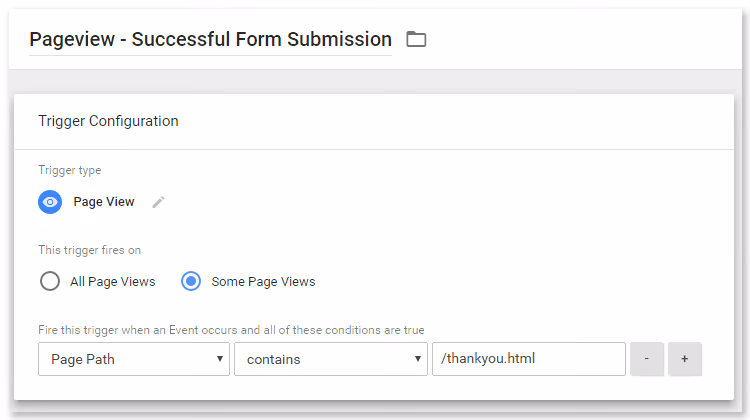
Step 2: Create a Pageview Trigger in GTM
- In GTM, create a new trigger named something like "Thank You Page Trigger."
- Set the trigger type to “Page View”.
- Define the trigger condition to “Some Page Views” and specify the thank-you page URL.
Step 3: Linking to a GA4 Event Tag
- Create a new GA4 Event Tag in GTM.
- Insert your GA4 Measurement ID.
- Name your event to reflect the action, like “form_thank_you”.
- Associate this tag with the "Thank You Page Trigger".
Testing
- Fill out and submit a form on your site.
- Confirm that it redirects you to the "Thank You" page as expected.
- Use GTM’s Preview and Debug mode to observe the form submission.
- Verify that the "Thank You Page Trigger" activates and that the GA4 Event Tag fires on the thank-you page.
Method 3: Tracking Form with Element Visibility Trigger
This method is a perfect fit for forms that quietly confirm submissions on the same page. No dramatic page shifts, just a simple, “Hey, we got your message!” popping up right there.
The best thing about this method? It’s user-friendly and adaptable to various confirmation styles. Plus, it’s incredibly useful for A/B testing.
Setup Guide
Step 1: Spot the Confirmation Message
- Identify the element that signals a successful form submission. It could be a thank-you message or a confirmation banner.
- Use your detective skills (or a bit of help from a developer) to find the CSS Selector or ID of this element.
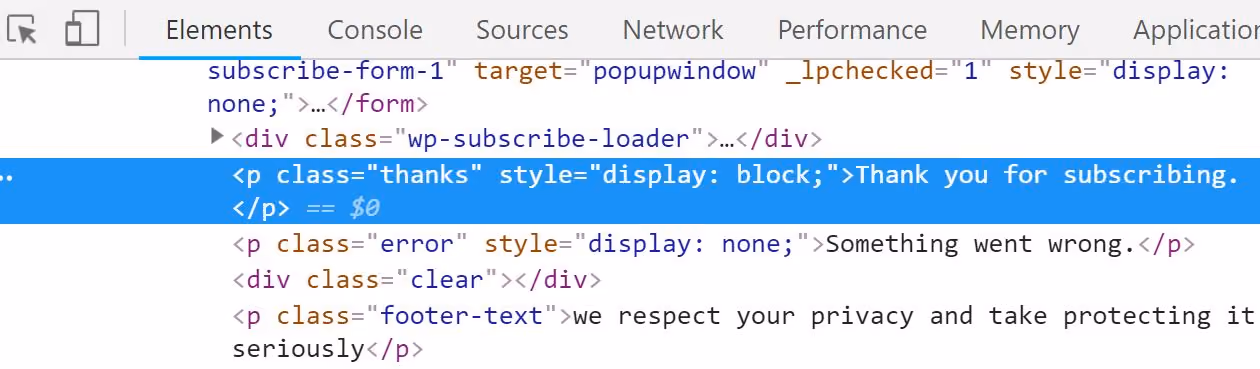
- For instance, consider a form that displays a “Thank you” message. Right-click on the success message and choose to inspect it.
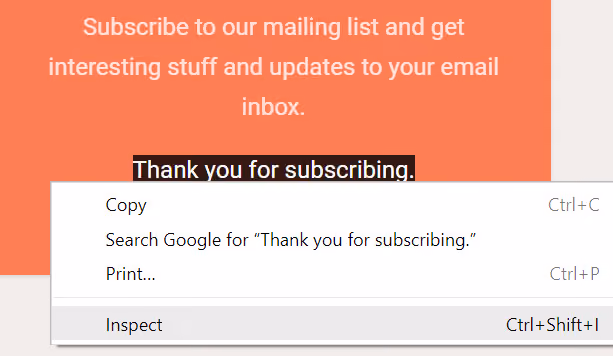
- Now, find the success message’s CSS class. In this example, it’s “thanks”. This is crucial for setting up the trigger.
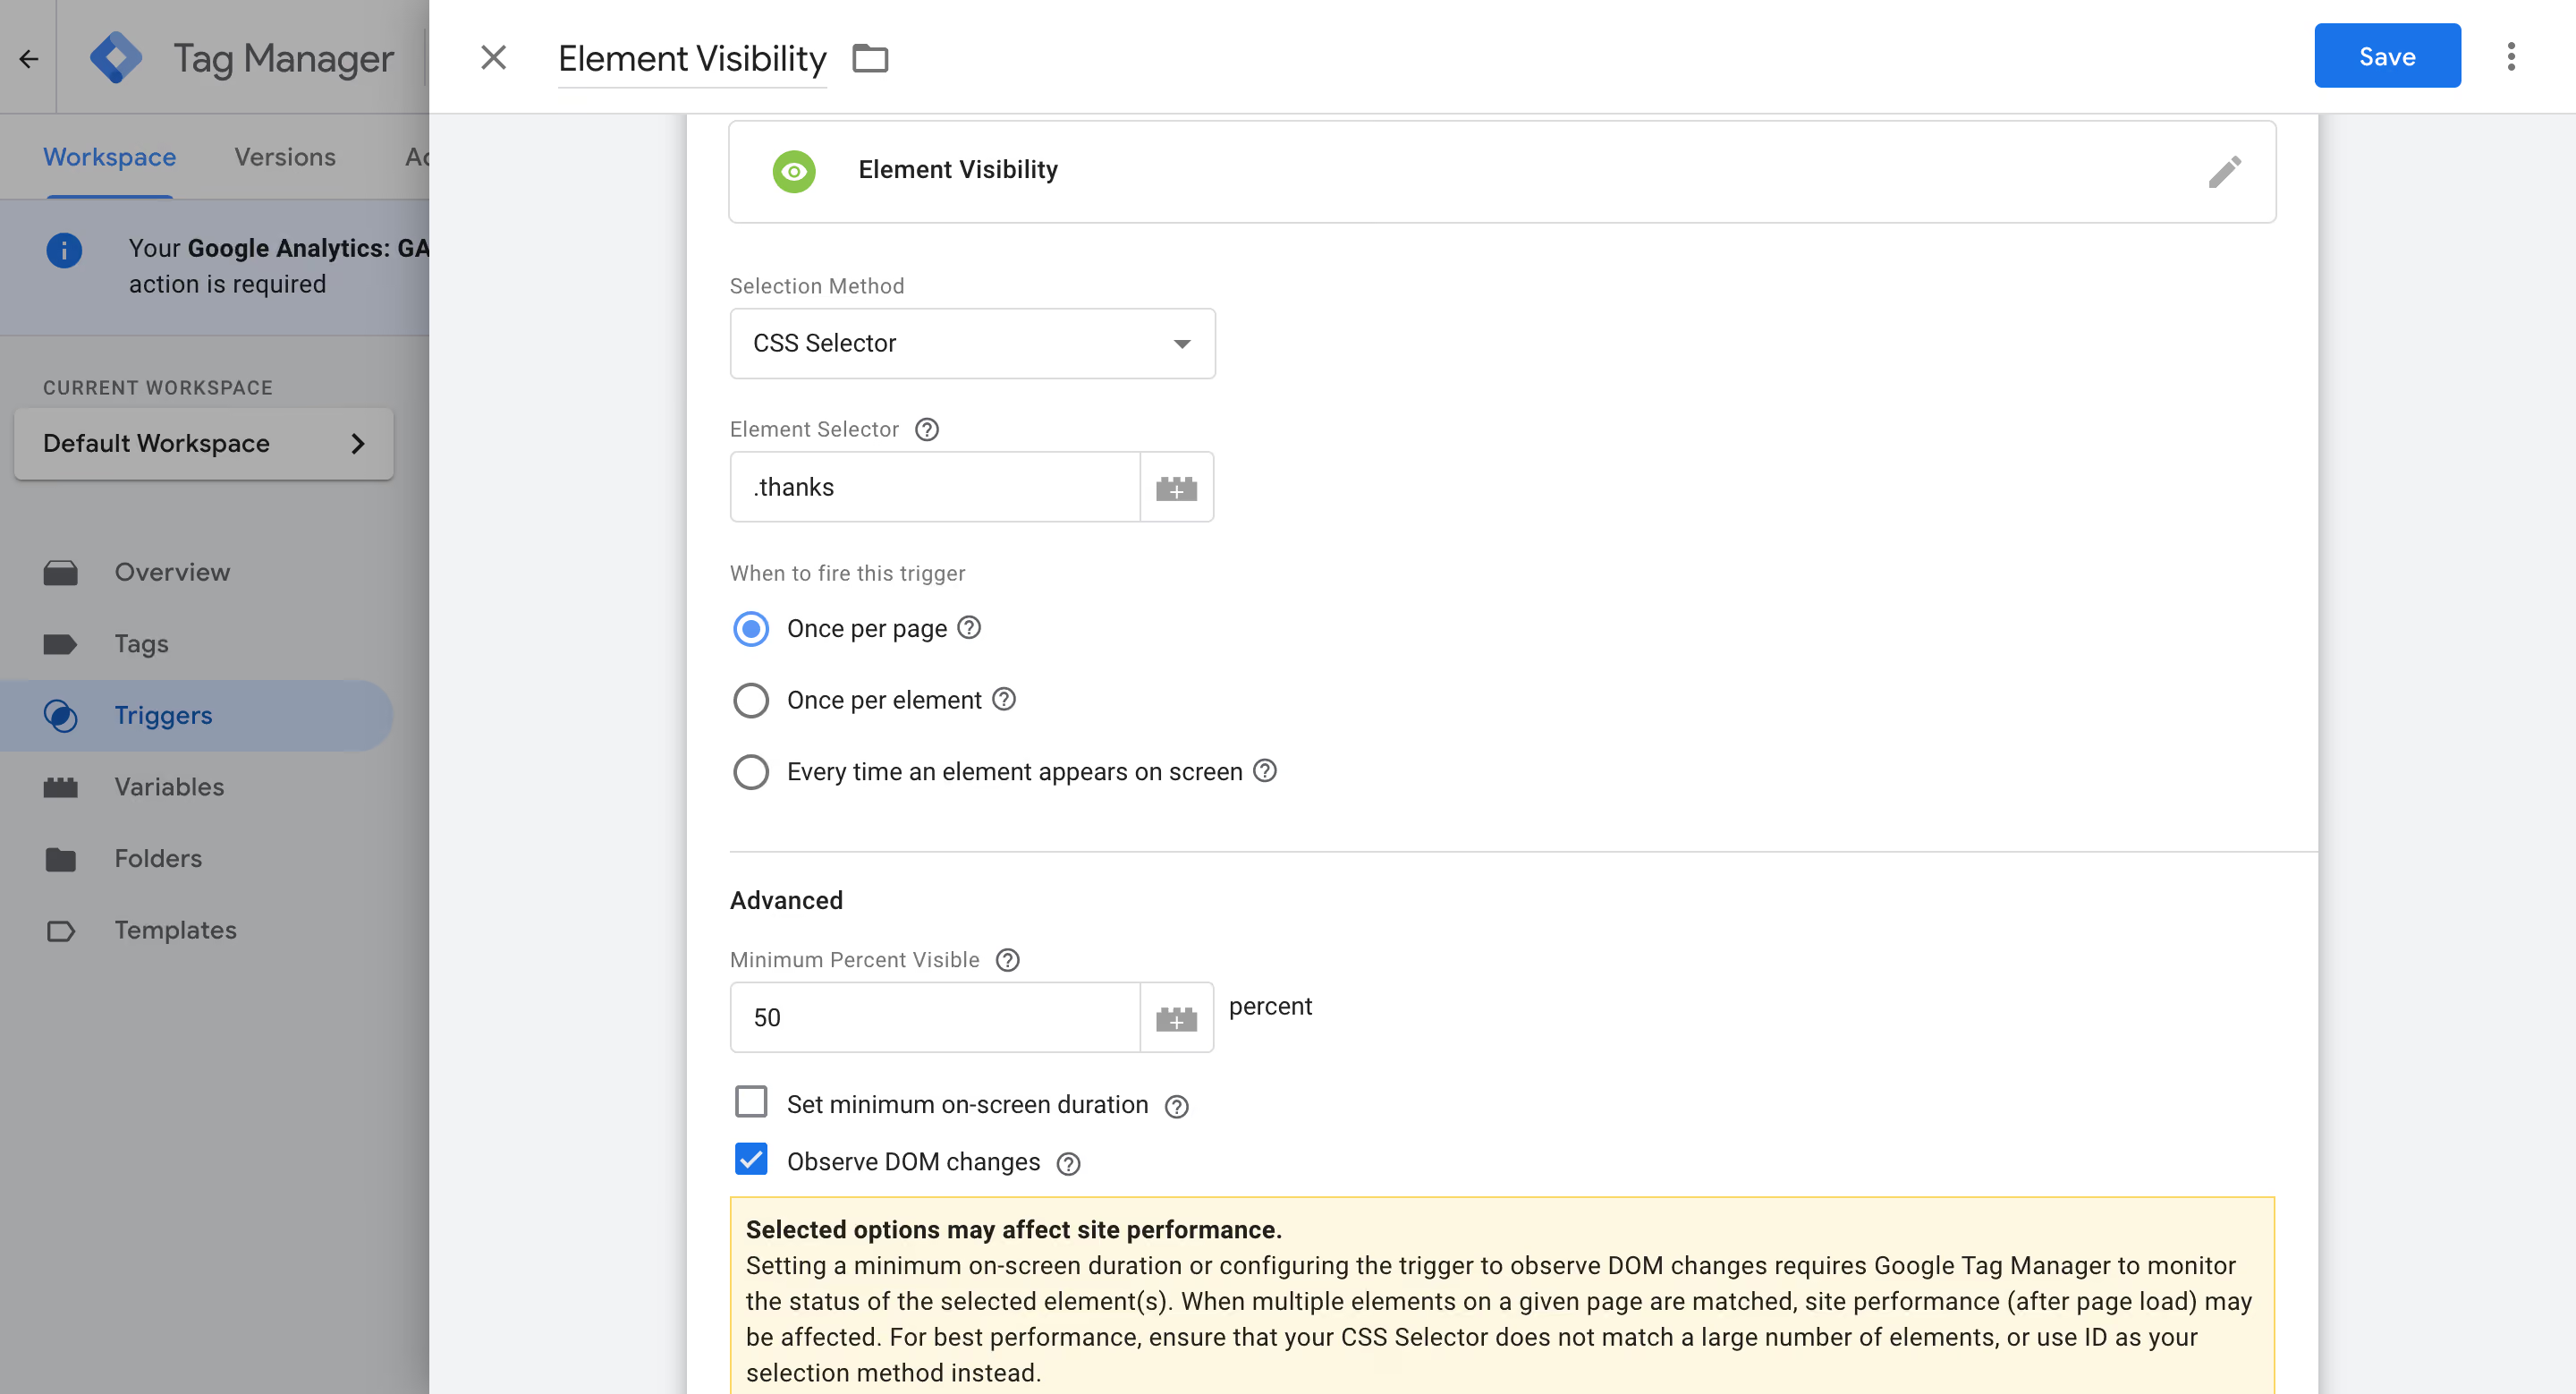
Step 2: Craft an Element Visibility Trigger in GTM
- In GTM, create a new trigger and name it something like "Form Confirmation Visible."
- Choose “Element Visibility” as your trigger type. And in the selection method, choose “CSS Selector”.

- Define the element to track by entering its CSS Selector. In our example, it’s “thanks”.
- Enable “Observe DOM changes” in GTM. This crucial setting ensures you capture every important element that pops up on your site, beyond just scrolling events.
Step 3: Link to a GA4 Event Tag
- Go to the Tags section in GTM and set up a new GA4 Event Tag.
- Connect this tag to the Element Visibility Trigger you just whipped up.

Testing
- Head to your website and complete a form submission.
- Keep your eyes peeled for that confirmation message—that’s your cue.
- Fire up GTM’s Preview and Debug mode to spy on the behind-the-scenes action.
- Verify that the GA4 Event Tag leaps into action when the confirmation message appears on the screen.
Method 4: Track Form Submissions with DOM Scraping
DOM Scraping is your go-to solution for those tricky forms where standard tracking methods fall short.
The beauty of DOM Scraping lies in its precision and depth. It digs deep to capture the specific details that other tracking methods might overlook.
But if you often update your website’s code, DOM Scraping should be your last choice.
Let’s understand how to apply this method with an example.
Consider a scenario in a Shopify demo store where users subscribe to a mailing list. Upon submission, the page displays a "Thank you for subscribing" message without a significant URL change. This scenario is ideal for demonstrating DOM Scraping.
Setup Guide
Step 1: Identify and Inspect the Target Element
- On the Shopify demo store's homepage, identify the "Thank you for subscribing" message that appears post form submission.
- Right-click on this message and select “Inspect”. This opens the developer console, showing the HTML and CSS related to this message.
Step 2: Create a DOM Element Variable in GTM
- In your GTM dashboard, navigate to the “Variables” section.
- Click “New”, choose “DOM Element” as the type, and select “CSS Selector” for the selection method. For our example, enter the CSS Selector as “div.note.form-success”.
- Label the variable as “DOM – Form Success Message” and save it.
Step 3: Configure the Trigger in GTM
- In GTM, select “Triggers” and click “New”. Choose “DOM Ready” as the trigger type.
- Set it to fire when “DOM – Form Success Message equals Thanks for subscribing”, ensuring it activates only when the success message is displayed.
- Finalize and Save the Trigger.
Step 4: Link to a GA4 Event Tag
- In GTM's “Tags” section, create a new GA4 Event Tag.
- Configure the tag with your GA4 settings and select the trigger created in Step 3.
- Use the “DOM – Form Success Message” variable in the tag setup.
- Name the tag (e.g., “GA4 - Form Submission Event”) and save.
Testing
- Activate Preview and Debug mode in GTM.
- Visit the Shopify demo store, fill in, and submit the mailing list form.
- In the debug console, under the “DOM Ready” event, check if the “DOM – Form Success Message” variable captures “Thanks for subscribing” and whether the GA4 Event Tag fires.
- Confirm that the event is recorded in Google Analytics 4's Debug View.
- Submit the form with an error (like an invalid email) to ensure the GA4 tag does not fire inappropriately.
Method 5: Form Tracking with dataLayer Events
Opt for this method when you have access to developers and other methods aren’t working for you.
Why pick this method? It offers extensive customization and detailed insights into user interactions with your forms.
Setup Guide
Step 1: Define Your dataLayer Event
- Work with your web development team to define the specific event to be pushed to the dataLayer upon form submission.
- This event should include essential data points like form ID, user input details, timestamps, etc.
Example of a dataLayer push code:
<script>
window.dataLayer.push({
'event': 'event_name'
});
</script>
(In the above code, the event name is variable. You can use the event name of your choice.)
Step 2: Preview in GTM and Confirm the Event
- After adding the code to your site, open GTM's Preview mode.
- Submit a form on your website.
- Check if the “formSubmission” event appears in the dataLayer in the GTM debug console.
Step 3: Setup Data Layer Variables in GTM
- For each data point you are tracking, create corresponding Data Layer Variables in GTM. For example, set up variables for “formID” and “userDetails.name”.
Step 4: Configure a Custom Event Trigger
- Set up a new trigger in GTM.
- Choose “Custom Event” as the trigger type.
- Configure it to listen for your specific dataLayer event.
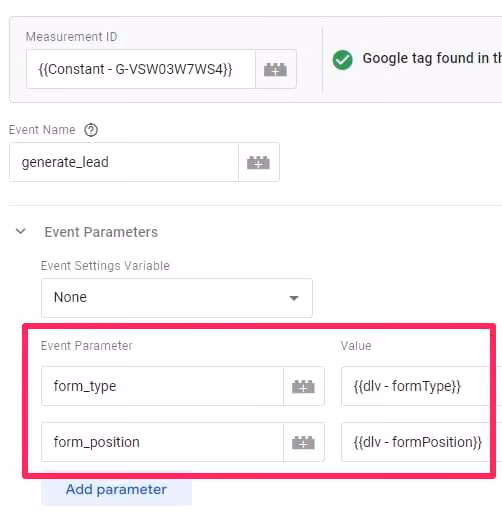
Step 5: Link to a GA4 Event Tag
- Finally, tie everything together with a GA4 Event Tag in GTM. This tag should utilize your newly created Data Layer Variables to relay the data to GA4.
Testing
- Test the form submission process and verify that the custom event is correctly pushed to the data layer.
- Use GTM's Preview and Debug mode to ensure the GA4 tag fires appropriately when a form is submitted.
Track Your Form Today!
The journey through effective form submission tracking ends not just with knowledge, but with action.
Choose the right method for your site and harness the combined power of Google Analytics 4 (GA4) and Google Tag Manager (GTM).
Start tracking, gain unparalleled insights, and transform those insights into impactful marketing strategies.
As you start implementing these methods, enhance your knowledge with our specialized guide on HubSpot form tracking in GA4 using GTM to further refine your skills.
For deeper insights and advanced tracking setups, collaborating with a Marketing Analytics Agency can help you connect your form submissions to real business impact.
And if you find yourself needing assistance, don't hesitate to reach out. Our team at TripleDart is here to guide you through each step of form tracking.
Let's make every interaction on your website count!

summarize with ai


